The CTP Launcher Configuration Editor
UNDER CONSTRUCTION
This article describes how to use the CTP Launcher program to edit the configuration file. The intended audience for this article is system administrators.
The Launcher program is the standard way to start and stop CTP when CTP is not running as a service. It displays a window containing a tabbed pane with these tabs:
- General: Tables for setting important parameters, plus Start and Stop buttons and a button to launch a browser and access the CTP home page.
- Version: A table displaying the key version information for CTP, its main libraries, plus Java and the ImageIO Tools.
- System: A table displaying all the Java system properties.
- Configuration: A GUI for editing the CTP configuration file.
- Console: A live pane displaying the system and error output streams.
- Log: A static psne displaying the CTP log file, with a button to refresh the display manually.
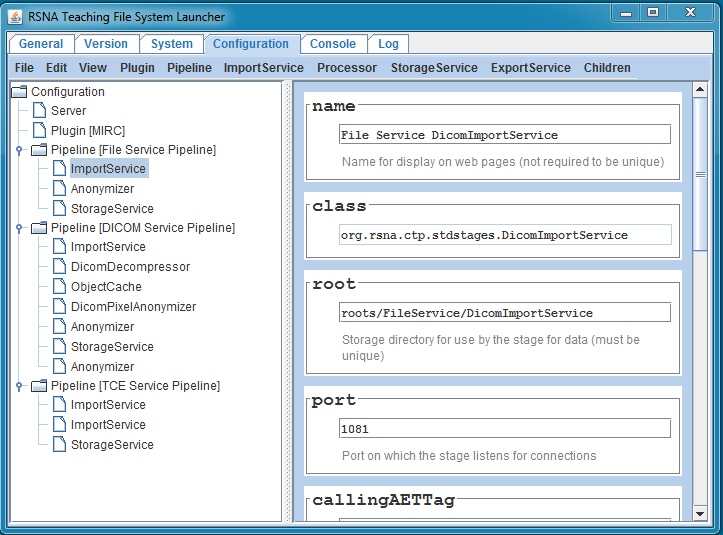
This article describes the Configuration pane. After starting the Launcher program, click the Configuration tab. In the left pane, a tree will display showing the structure of the configuration file. Clicking on any node in the tree will display all the allowed attributes and child elements of the selected node, with text fields for changing the values.
Pipeline stages and Plugins can be dragged and dropped to rearrange the configuration.
The window has a menu bar with the following menus:
- File:
- Save (CTRL-S): Makes a backup copy of the current config.xml file and then saves the edited configuration in the config.xml file. Backup files are located in the CTP directory. They have names with the form config[{n}].xml, where {n} is an integer. Higher integers are more recent.
- Edit:
- Remove (CTRL-R): Removes the selected node (if removing the node is allowed). No Undo function is currently provided, and no "Are you sure?" confirmation is required, so be careful.
- View:
- Form (CTRL-F): Displays the selected node as an editable form in the right pane as shown here.
- XML (CTRL-D): Displays the selected node as XML in the right pane. The XML is not editable. The editor knows the default values for all attributes and does not include attributes that have the default values.
- Expand all (CTRL-E): Expands all tree nodes in the left pane.
- Plugin: Provides one item for each
