Difference between revisions of "MIRC TFS"
(→Java) |
|||
| (6 intermediate revisions by 2 users not shown) | |||
| Line 1: | Line 1: | ||
| − | This article describes the new version of the MIRC teaching file system running as a plug-in on CTP. This article is intended for people interested in installing MIRC. | + | This article describes the new version of the MIRC teaching file system (TFS) running as a plug-in on CTP. This article is intended for people interested in installing MIRC. |
===Background=== | ===Background=== | ||
| Line 8: | Line 8: | ||
The Tomcat-based versions supported both teaching files and clinical trials. In the clinical trials application, however, the extra complexity of the Tomcat installation was an impediment, so a special clinical trials application was developed called <b>CTP</b>. CTP contains its own embedded servlet container, providing the necessary capabilities from Tomcat without the need for a separate installation step. It also contains a more capable processing facility and anonymizers that implement the DICOM Supplement 142 de-identification profiles. For more information on CTP, see [[CTP-The RSNA Clinical Trial Processor]]. | The Tomcat-based versions supported both teaching files and clinical trials. In the clinical trials application, however, the extra complexity of the Tomcat installation was an impediment, so a special clinical trials application was developed called <b>CTP</b>. CTP contains its own embedded servlet container, providing the necessary capabilities from Tomcat without the need for a separate installation step. It also contains a more capable processing facility and anonymizers that implement the DICOM Supplement 142 de-identification profiles. For more information on CTP, see [[CTP-The RSNA Clinical Trial Processor]]. | ||
| − | As experience was gained with CTP, it became clear that it could serve as the servlet container for MIRC, providing both new features and simplified installation. To support MIRC, numerous extensions to CTP were implemented, the most important of which was the development of plug-ins, which provide processing capabilities outside the normal CTP pipelines. MIRC is implemented as a single plug-in in this framework. | + | As experience was gained with CTP, it became clear that it could serve as the servlet container for MIRC, providing both new features and simplified installation. To support MIRC, numerous extensions to CTP were implemented, the most important of which was the development of plug-ins, which provide processing capabilities outside the normal CTP pipelines. MIRC TFS is implemented as a single plug-in in this framework. |
| − | + | In early 2012, the MIRC Committee changed the name of the teaching files application from MIRC to TFS. In the context of this article, MIRC and TFS are used as synonyms. | |
| − | The | + | The new MIRC TFS implementation is denoted with the <b>Z</b> prefix. The starting release identifier has been reset to <b>1</b>, so the first release is designated <b>Z1</b>. |
| − | + | The CTP/MIRC TFS implementation is recommended for all new MIRC TFS installations. | |
===Installation=== | ===Installation=== | ||
| − | Three components are required for running a MIRC site under CTP: | + | Three components are required for running a MIRC TFS site under CTP: |
* Java | * Java | ||
* JAI ImageIO Tools | * JAI ImageIO Tools | ||
| − | * CTP and the MIRC plug-in | + | * CTP and the MIRC TFS plug-in |
====Java==== | ====Java==== | ||
| − | The Java 1. | + | The Java 1.7 (or better) JRE must be present on the system. Java 1.8 is strongly recommended. Java is available through the [http://www.oracle.com/technetwork/java/javase/downloads/index.html Java] website. Note that only the JRE is required, not the JDK. |
:<em>When installing Java, make sure to obtain the 32-bit version, even if you are running on a 64-bit platform. Sophisticated users may be able to run the 64-bit versions on some platforms, but the gains would be minimal and the likelihood of encountering problems would be large.</em> | :<em>When installing Java, make sure to obtain the 32-bit version, even if you are running on a 64-bit platform. Sophisticated users may be able to run the 64-bit versions on some platforms, but the gains would be minimal and the likelihood of encountering problems would be large.</em> | ||
====JAI ImageIO Tools==== | ====JAI ImageIO Tools==== | ||
| − | MIRC requires that the [http:// | + | MIRC requires that the [http://mircwiki.rsna.org/index.php?title=Java_Advanced_Imaging_ImageIO_Tools Java Advanced Imaging ImageIO Tools] be present on the system. It is critically important that version 1.1 of the ImageIO Tools be installed rather than version 1.0. You must get the jre version (for Windows, it has a name like jai_imageio-1_1-lib-windows-i586-jre.exe), not the one for the CLASSPATH, which does not include <b>-jre</b> in the name. |
:<em>Note that the Java Advanced Imaging component is not the same as the Java Advanced Imaging ImageIO Tools. Only the latter component is required.</em> | :<em>Note that the Java Advanced Imaging component is not the same as the Java Advanced Imaging ImageIO Tools. Only the latter component is required.</em> | ||
| − | ====CTP/ | + | ====CTP/TFS==== |
| − | [[Image:MIRC-installer.jpg|thumb|right|400px]] The installer for | + | [[Image:MIRC-installer.jpg|thumb|right|400px]] The installer for MIRC TFS is available on the [http://mirc.rsna.org RSNA MIRC site]. Click the <b>Download Software</b> link in the left pane to obtain a list of all the available software. The <b>TFS-installer</b> available on the site includes CTP and all the libraries required to run the teaching files application. |
Once Java and the ImageIO Tools are installed, download the installer and place it on the disk on which you intend to install or upgrade the CTP program. Do <b>not</b> run it without downloading it and storing it locally. | Once Java and the ImageIO Tools are installed, download the installer and place it on the disk on which you intend to install or upgrade the CTP program. Do <b>not</b> run it without downloading it and storing it locally. | ||
| Line 49: | Line 49: | ||
<br clear="right"/> | <br clear="right"/> | ||
| − | ===Running CTP with the MIRC Plug-in=== | + | ===Running CTP with the MIRC TFS Plug-in=== |
Note that TFS is not a stand-alone program; it is a plug-in to CTP in the same way that previous versions of MIRC were webapps that ran under Tomcat. Therefore, it is most correct to speak of running <b>CTP</b> rather than <b>TFS</b> or <b>MIRC</b>, so that terminology is used here. | Note that TFS is not a stand-alone program; it is a plug-in to CTP in the same way that previous versions of MIRC were webapps that ran under Tomcat. Therefore, it is most correct to speak of running <b>CTP</b> rather than <b>TFS</b> or <b>MIRC</b>, so that terminology is used here. | ||
| Line 86: | Line 86: | ||
[[Image:UserManager.jpg|thumb|right|400px]] When the program is first installed, two users are provided. One user, with the name <b><tt>admin</tt></b> and password <b><tt>password</tt></b>, is intended for general system administration. The other user, with the name <b><tt>king</tt></b> and password <b><tt>password</tt></b>, has the ability to shut down the server through the browser interface. Both users have the ability to create and modify users and assign privileges through the User Manager, but only a user with the shutdown privilege can grant the shutdown privilege to another user. Most MIRC administrators log in as the <b><tt>admin</tt></b> user. | [[Image:UserManager.jpg|thumb|right|400px]] When the program is first installed, two users are provided. One user, with the name <b><tt>admin</tt></b> and password <b><tt>password</tt></b>, is intended for general system administration. The other user, with the name <b><tt>king</tt></b> and password <b><tt>password</tt></b>, has the ability to shut down the server through the browser interface. Both users have the ability to create and modify users and assign privileges through the User Manager, but only a user with the shutdown privilege can grant the shutdown privilege to another user. Most MIRC administrators log in as the <b><tt>admin</tt></b> user. | ||
| − | After installing and starting CTP and MIRC, access the query page, click the <b>Login</b> button to log in as the <b><tt>admin</tt></b> user, and then go to the <b>Admin > User Manager</b> menu item. This will display a page allowing you to add and modify users. To start, check all the boxes in the <b>admin</b> user except <b>shutdown</b> and then click the save icon in the upper right corner of the page. The page will re-display, showing that the changes have been made. You should change the passwords of these accounts at this time as well, using the unlabelled column at the right side of the table. If you need to create accounts for other users, use the blank line at the bottom of the table. Each time the save icon is clicked, a new blank line will appear. When all the changes have been made, click the home icon in the upper right corner of the page to go back to the query page. | + | After installing and starting CTP and MIRC TFS, access the query page, click the <b>Login</b> button to log in as the <b><tt>admin</tt></b> user, and then go to the <b>Admin > User Manager</b> menu item. This will display a page allowing you to add and modify users. To start, check all the boxes in the <b>admin</b> user except <b>shutdown</b> and then click the save icon in the upper right corner of the page. The page will re-display, showing that the changes have been made. You should change the passwords of these accounts at this time as well, using the unlabelled column at the right side of the table. If you need to create accounts for other users, use the blank line at the bottom of the table. Each time the save icon is clicked, a new blank line will appear. When all the changes have been made, click the home icon in the upper right corner of the page to go back to the query page. |
<br clear="right"/> | <br clear="right"/> | ||
| − | + | TFS has two user interfaces, the <b>Classic UI</b> and the <b>Integrated UI</b>. These present almost the same functionality in two different ways. Each only shows the user those functions that the user's privileges allow him to access. | |
::[[Image:ClassicUI.jpg|400px|Classic UI]] [[Image:IntegratedUI.jpg|400px|Integrated UI]] | ::[[Image:ClassicUI.jpg|400px|Classic UI]] [[Image:IntegratedUI.jpg|400px|Integrated UI]] | ||
| Line 97: | Line 97: | ||
[[Image:QSAdmin.jpg|center|500px]] | [[Image:QSAdmin.jpg|center|500px]] | ||
| − | On the Query Service Admin page, you can also control which other | + | On the Query Service Admin page, you can also control which other TFS sites are available to be queried. After making any changes, click the save icon and then click the home icon to return to the main query page. |
At this point, the site is ready for operation. | At this point, the site is ready for operation. | ||
==Client Configuration for Document Authoring== | ==Client Configuration for Document Authoring== | ||
| − | + | TFS provides authoring tools to create MIRCdocuments that are accessed through the user's browser. | |
When authoring a MIRCdocument, a special SVG viewer must be installed on the author's computer to allow images to be annotated. The free Adobe SVG viewer can be obtained from [http://www.adobe.com/svg/viewer/install/main.html the Adobe SVG Site]. Adobe no longer supports the SVG viewer, but it works just fine. At the bottom of the Adobe page, there is a table of versions for different operating systems. Adobe hasn’t updated the page since the late Pleistocene, and the last Windows version listed is XP, but it has been tested successfully on Vista and Windows 7 using IE7, 8, and 9, as well as the latest Firefox and Chrome. | When authoring a MIRCdocument, a special SVG viewer must be installed on the author's computer to allow images to be annotated. The free Adobe SVG viewer can be obtained from [http://www.adobe.com/svg/viewer/install/main.html the Adobe SVG Site]. Adobe no longer supports the SVG viewer, but it works just fine. At the bottom of the Adobe page, there is a table of versions for different operating systems. Adobe hasn’t updated the page since the late Pleistocene, and the last Windows version listed is XP, but it has been tested successfully on Vista and Windows 7 using IE7, 8, and 9, as well as the latest Firefox and Chrome. | ||
| Line 109: | Line 109: | ||
==Advanced Configuration== | ==Advanced Configuration== | ||
| − | In addition to plugins like the one that implements MIRC, CTP supports sequences of processing steps called pipelines. Pipelines are described in [[CTP-The RSNA Clinical Trial Processor]]. MIRC employs pipelines to support the reception of DICOM images for the File Service, the DICOM Service, and the TCE Service. The MIRC pipelines are described in [[MIRC Pipelines]]. | + | In addition to plugins like the one that implements MIRC TFS, CTP supports sequences of processing steps called pipelines. Pipelines are described in [[CTP-The RSNA Clinical Trial Processor]]. MIRC employs pipelines to support the reception of DICOM images for the File Service, the DICOM Service, and the TCE Service. The MIRC pipelines are described in [[MIRC Pipelines]]. |
Each service pipeline has its own DICOM Storage SCP. The default ports for these SCPs are: | Each service pipeline has its own DICOM Storage SCP. The default ports for these SCPs are: | ||
* File Service: port 1081 | * File Service: port 1081 | ||
| Line 118: | Line 118: | ||
==Using LDAP for Authentication== | ==Using LDAP for Authentication== | ||
CTP can be configured to support LDAP for user authentication. See [[CTP Authentication Using LDAP]] for details. | CTP can be configured to support LDAP for user authentication. See [[CTP Authentication Using LDAP]] for details. | ||
| + | |||
| + | ==Using OpenAM for Authentication== | ||
| + | CTP can be configured to support OpenAM for user authentication. See [[CTP Authentication Using OpenAM]] for details. | ||
==Upgrading a Tomcat MIRC Site== | ==Upgrading a Tomcat MIRC Site== | ||
Latest revision as of 14:16, 2 October 2019
This article describes the new version of the MIRC teaching file system (TFS) running as a plug-in on CTP. This article is intended for people interested in installing MIRC.
1 Background
MIRC - Medical Imaging Resource Center - is an RSNA project to provide tools for radiological teaching files and clinical trials. Beginning in 2000, the project has produced many software releases.
The earliest versions of MIRC were restricted to Microsoft platforms, using IIS as the server (versions 1-9). Starting with version 10, MIRC was rewritten in Java to run on Tomcat. Those versions were denoted with the prefix T (T10-T36).
The Tomcat-based versions supported both teaching files and clinical trials. In the clinical trials application, however, the extra complexity of the Tomcat installation was an impediment, so a special clinical trials application was developed called CTP. CTP contains its own embedded servlet container, providing the necessary capabilities from Tomcat without the need for a separate installation step. It also contains a more capable processing facility and anonymizers that implement the DICOM Supplement 142 de-identification profiles. For more information on CTP, see CTP-The RSNA Clinical Trial Processor.
As experience was gained with CTP, it became clear that it could serve as the servlet container for MIRC, providing both new features and simplified installation. To support MIRC, numerous extensions to CTP were implemented, the most important of which was the development of plug-ins, which provide processing capabilities outside the normal CTP pipelines. MIRC TFS is implemented as a single plug-in in this framework.
In early 2012, the MIRC Committee changed the name of the teaching files application from MIRC to TFS. In the context of this article, MIRC and TFS are used as synonyms.
The new MIRC TFS implementation is denoted with the Z prefix. The starting release identifier has been reset to 1, so the first release is designated Z1.
The CTP/MIRC TFS implementation is recommended for all new MIRC TFS installations.
2 Installation
Three components are required for running a MIRC TFS site under CTP:
- Java
- JAI ImageIO Tools
- CTP and the MIRC TFS plug-in
2.1 Java
The Java 1.7 (or better) JRE must be present on the system. Java 1.8 is strongly recommended. Java is available through the Java website. Note that only the JRE is required, not the JDK.
- When installing Java, make sure to obtain the 32-bit version, even if you are running on a 64-bit platform. Sophisticated users may be able to run the 64-bit versions on some platforms, but the gains would be minimal and the likelihood of encountering problems would be large.
2.2 JAI ImageIO Tools
MIRC requires that the Java Advanced Imaging ImageIO Tools be present on the system. It is critically important that version 1.1 of the ImageIO Tools be installed rather than version 1.0. You must get the jre version (for Windows, it has a name like jai_imageio-1_1-lib-windows-i586-jre.exe), not the one for the CLASSPATH, which does not include -jre in the name.
- Note that the Java Advanced Imaging component is not the same as the Java Advanced Imaging ImageIO Tools. Only the latter component is required.
2.3 CTP/TFS
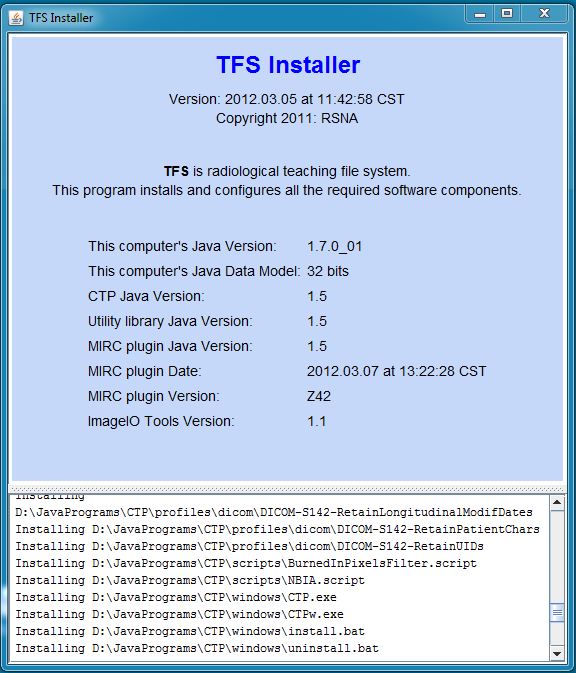
The installer for MIRC TFS is available on the RSNA MIRC site. Click the Download Software link in the left pane to obtain a list of all the available software. The TFS-installer available on the site includes CTP and all the libraries required to run the teaching files application.
Once Java and the ImageIO Tools are installed, download the installer and place it on the disk on which you intend to install or upgrade the CTP program. Do not run it without downloading it and storing it locally.
- For convenience, it is recommended (but not required) that a folder called JavaPrograms be created in the root of the disk drive. The installer does not create this folder, but if it is present, the installer will very quickly find it and suggest installing CTP there. This is especially helpful during future upgrades.
To run the TFS installer, double-click the TFS-installer.jar file and choose a directory in which to install CTP. The installer can also be run in a command window using the command:
- java -jar TFS-installer.jar
The installer creates a directory called CTP in the selected location and places several files and directories in it.
When the installer runs, it checks several parameters of the system and highlights in red any components that are not correct for the running of CTP.
3 Running CTP with the MIRC TFS Plug-in
Note that TFS is not a stand-alone program; it is a plug-in to CTP in the same way that previous versions of MIRC were webapps that ran under Tomcat. Therefore, it is most correct to speak of running CTP rather than TFS or MIRC, so that terminology is used here.
There are three ways to start CTP:
- Launcher.jar - a program for manually starting and stopping CTP through a dialog window. This program is normally used when CTP is installed on an individual user's computer for occasional use.
- Runner.jar - a program for starting and stopping CTP with no user interface. This program is normally used when CTP is installed on a Linux or Mac system for institutional use, running as an automatic service. See Running CTP as a Linux Service for instructions.
- CTP can also be run as a Windows or Linux service. See Running CTP as a Windows Service or Running CTP as a Linux Service for instructions.
The Launcher.jar program can be started by double-clicking the file or by launching a command window and entering the command:
- java -jar Launcher.jar
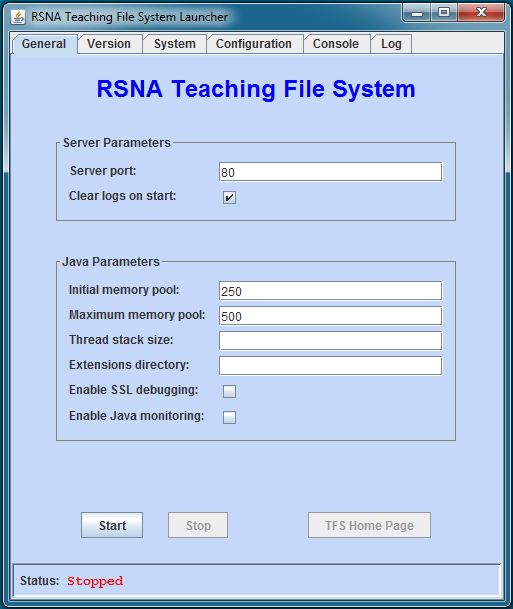
The launcher displays a dialog providing start/stop buttons and fields for controlling several parameters used by the system.
The Server port field allows you to change the port on which the server runs.
The default memory configuration is sufficient for all but the very largest sites. For sites with 2000 or more teaching file cases, the Maximum memory pool parameter should be increased to 500. For sites with more than 3000 cases, 750 is recommended.
The Extensions directory parameter is intended for special applications in which third-party software is added into the system. One such application is the NCI's National Biomedical Image Archive (NBIA). Normal teaching file systems do not require this parameter.
Across the top of the dialog are several tabs providing access to information about the versions of the components, the system parameters in use by Java as the program runs, and any messages output by the program either directly or through its log file. These are only present as a convenience; they are not typically used in normal operation.
As a convenience, the TFS Home Page button launches the user's browser and goes directly to the main TFS page.
To stop the program, either click the Stop button on the dialog or log in as a user with the shutdown privilege and click the Shutdown item in the Admin > CTP menu on the main query page. As a convenience, a user with the admin privilege can also shut the server down if the user's browser is running on the same computer as the server.
4 Accessing TFS from the Network
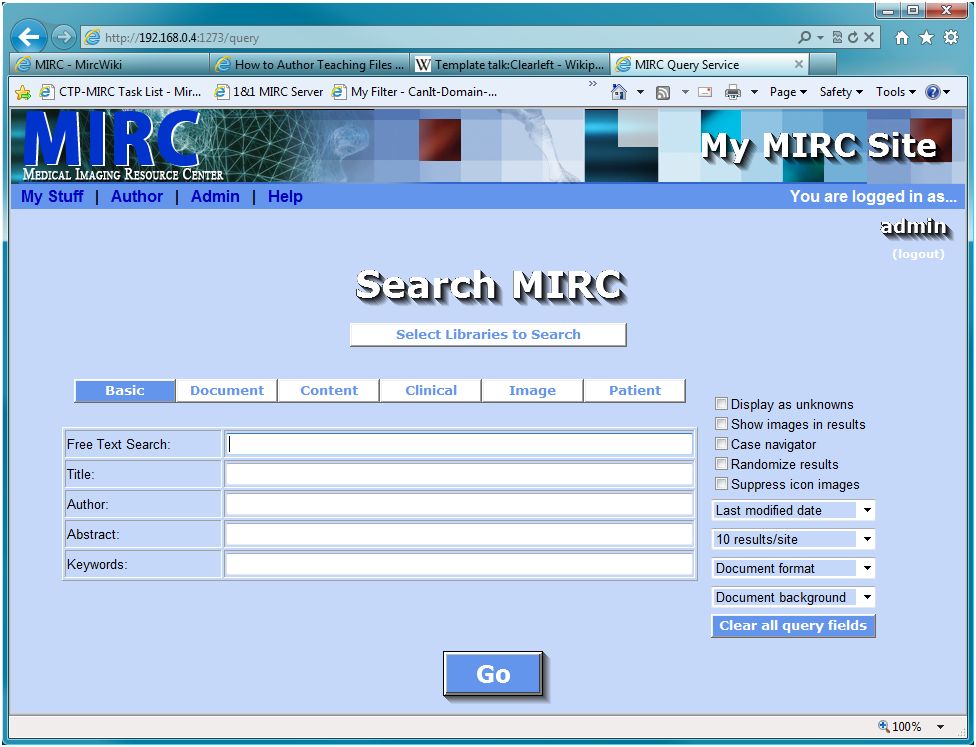
When CTP starts, it loads the MIRC plug-in. The MIRC plug-in installs several servlets to provide access to the system. The query page serves as the portal into all the TFS features. Its URL is:
- /query
Several other URLs also end up at the query page, but they do so by redirecting the browser, so it is most efficient to use the actual query page URL. Other URLs that go to the query page are:
- /
- /mirc
5 Server Configuration
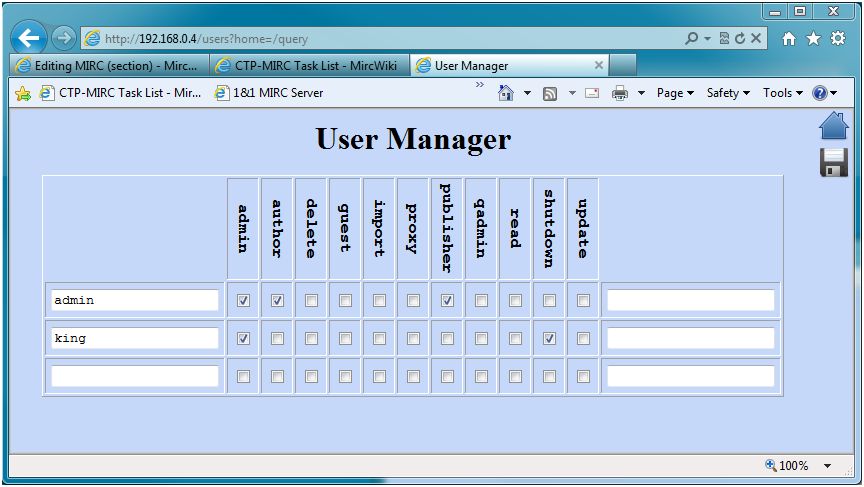
When the program is first installed, two users are provided. One user, with the name admin and password password, is intended for general system administration. The other user, with the name king and password password, has the ability to shut down the server through the browser interface. Both users have the ability to create and modify users and assign privileges through the User Manager, but only a user with the shutdown privilege can grant the shutdown privilege to another user. Most MIRC administrators log in as the admin user.
After installing and starting CTP and MIRC TFS, access the query page, click the Login button to log in as the admin user, and then go to the Admin > User Manager menu item. This will display a page allowing you to add and modify users. To start, check all the boxes in the admin user except shutdown and then click the save icon in the upper right corner of the page. The page will re-display, showing that the changes have been made. You should change the passwords of these accounts at this time as well, using the unlabelled column at the right side of the table. If you need to create accounts for other users, use the blank line at the bottom of the table. Each time the save icon is clicked, a new blank line will appear. When all the changes have been made, click the home icon in the upper right corner of the page to go back to the query page.
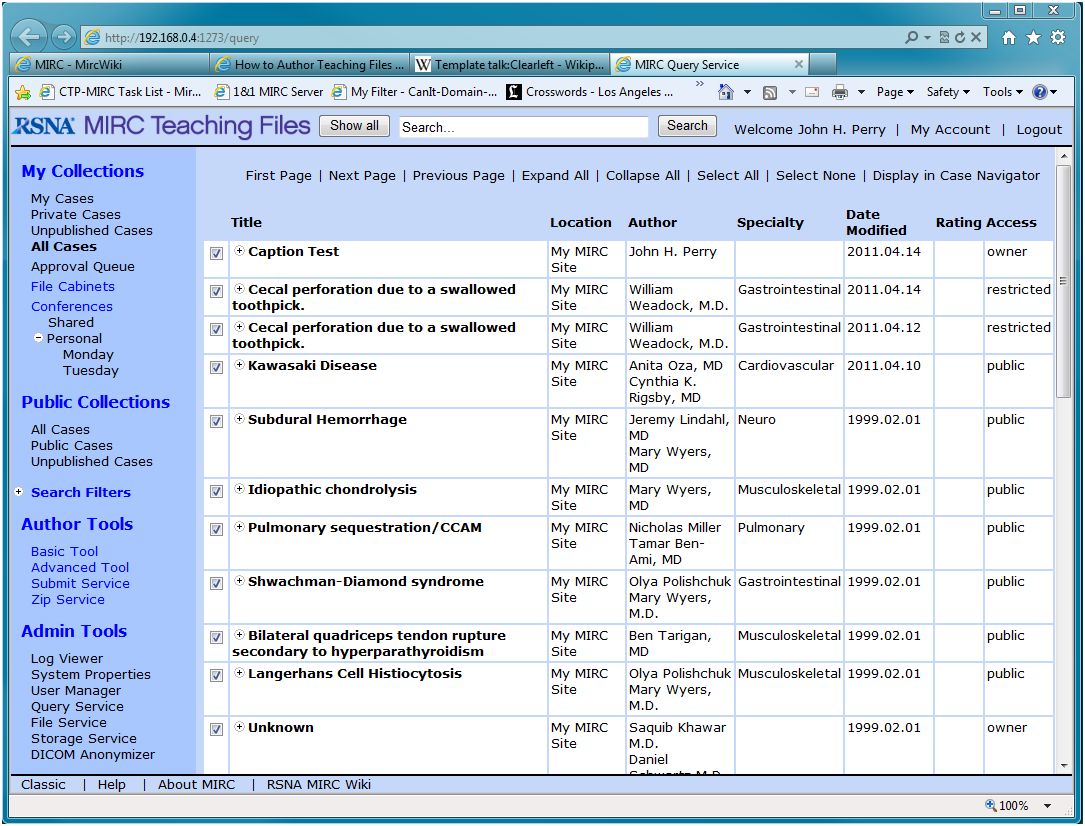
TFS has two user interfaces, the Classic UI and the Integrated UI. These present almost the same functionality in two different ways. Each only shows the user those functions that the user's privileges allow him to access.
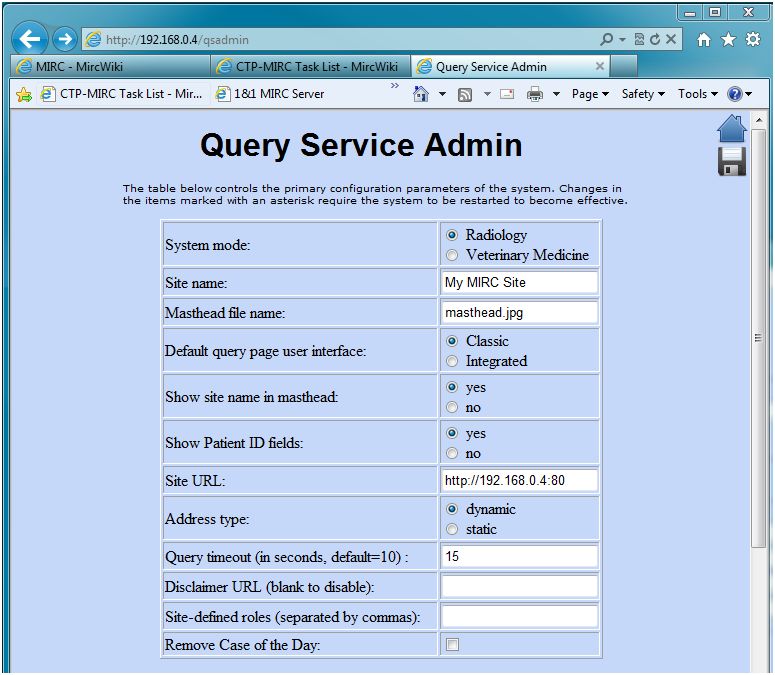
Individual users can choose their preferred UI and switch between them easily. As the administrator, you can choose the default UI to be presented to an unauthenticated user. To do so, go to the Admin > Query Service Admin menu item. On that page, select the desired radio button in the Default query page user interface field and then click the save button:
On the Query Service Admin page, you can also control which other TFS sites are available to be queried. After making any changes, click the save icon and then click the home icon to return to the main query page.
At this point, the site is ready for operation.
6 Client Configuration for Document Authoring
TFS provides authoring tools to create MIRCdocuments that are accessed through the user's browser.
When authoring a MIRCdocument, a special SVG viewer must be installed on the author's computer to allow images to be annotated. The free Adobe SVG viewer can be obtained from the Adobe SVG Site. Adobe no longer supports the SVG viewer, but it works just fine. At the bottom of the Adobe page, there is a table of versions for different operating systems. Adobe hasn’t updated the page since the late Pleistocene, and the last Windows version listed is XP, but it has been tested successfully on Vista and Windows 7 using IE7, 8, and 9, as well as the latest Firefox and Chrome.
The SVG viewer is not required for displaying annotated images, only for creating the annotations themselves, so the viewer need only be installed on computers used by authors who wish to create annotations.
7 Advanced Configuration
In addition to plugins like the one that implements MIRC TFS, CTP supports sequences of processing steps called pipelines. Pipelines are described in CTP-The RSNA Clinical Trial Processor. MIRC employs pipelines to support the reception of DICOM images for the File Service, the DICOM Service, and the TCE Service. The MIRC pipelines are described in MIRC Pipelines. Each service pipeline has its own DICOM Storage SCP. The default ports for these SCPs are:
- File Service: port 1081
- DICOM Service: port 1082
- TCE Service: port 1083.
These ports can be changed to any unused ports on the system. After starting CTP/MIRC for the first time, click the Log button on the CTP-launcher dialog and see if there are any log entries indicating that an address was already in use. If so, see the MIRC Pipelines article and move the offending service to another port.
8 Using LDAP for Authentication
CTP can be configured to support LDAP for user authentication. See CTP Authentication Using LDAP for details.
9 Using OpenAM for Authentication
CTP can be configured to support OpenAM for user authentication. See CTP Authentication Using OpenAM for details.
10 Upgrading a Tomcat MIRC Site
To upgrade from the Tomcat MIRC implementation to the CTP MIRC implementation, there are two steps:
- create a fresh installation of CTP MIRC
- copy the existing Tomcat MIRC site to the CTP MIRC site.
To assist in copying the old site to the new one, the CTP MIRC installation includes a program called Copier.jar in the CTP directory. To run the program, double-click the file or start it with the command:
- java -jar Copier.jar
The Copier program can be run while the Tomcat MIRC site is running. The Tomcat MIRC site is not modified in any way.
If the Copier program is run while the CTP MIRC site is running, it automatically stops the site.
The Copier program copies:
- the users' accounts
- the users' names, affiliations, and contact information
- the storage services:
- all the MIRCdocuments
- the settings:
- Storage Service tagline
- Author Service enable
- Submit Service enable
- Zip Service enable
- DICOM Service enable
- TCE Service enable
- autoindex enable
- maximum upload size
- JPEG quality parameter
- deleted documents timeout
The following information is not copied:
- the users' file cabinets
- the shared file cabinet
- the users' conferences
- the shared conferences
Notes:
- If a user already exists in the CTP site, that user is not modified.
- When copying a storage service, the program tries to find an existing storage service with the same name. If it finds one, it adds the documents to the existing storage service. If it does not find one, it creates a new storage service.
- The program can be run multiple times without creating duplicate user accounts, storage services, or MIRCdocuments.
- When the CTP MIRC site is first installed, one empty storage service is automatically provided. After copying from the Tomcat site to the CTP site, this storage service may still be empty. If you want to remove it, go to the Storage Service admin page and click the Remove this Storage Service button.
